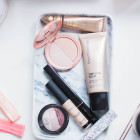
The perks of applying makeup in the winter? Glossing your face with highlighter and knowing that it won’t melt down your face like it does in the hot summer months (been there, done that). So it’s no surprise that this post is dedicated to all you illuminating lovers out there. I’ve rounded up my tried and true luminizers (from an extremely affordable $1 pick to can’t-live-without high-end goodies) that are perfect for a night out on the town or for on-the-go appearances. I find that shades of pearly pinks is universally flattering on almost any skin tone. For the ultimate winter glow, make sure you apply moisturizer prior to highlighter to prevent flaky or dry skin. Blend around the temples, top of cheek bones, bridge of nose and cupid’s bow (the outline of your upper lip) for a sweet and dewy finish.
Every time I don false lashes, the following question easily becomes my standard greeting when I’m out on the town: “Are my lashes still on?” Chances are you’ve done that too, but thanks to some advice from a true lash connoisseur, we hopefully won’t have to ever ask that question again. Liv Contreras breaks down the must-have false lash kit, how to figure out what type of falsies are for you and tips and tricks for applying and removing lashes. Just another reason to be thankful this holiday season!
The Product: Lash Appeal Kit, $28; includes individual lash clusters, temporary adhesive, tweezers.
The Expert: Licensed aesthetician and lash connoisseur Liv Contreras, owner of Lashfully, the west coast lash extensions boutique service that I hope makes its way to the east coast soon!
The Advice: “Before applying your lashes think about what type of look you would like to create. If you want a simple cat-eye you will want to concentrate on the outside edges of the eye and use the longer set of individual lashes. If you want to achieve an overall glamorous look you will need to apply a mix between the smaller and larger lashes to get a fuller look. Make sure the quality of the lashes and temporary adhesive are strong. The lashes should be soft to the touch and not feel plastic or bendable. The adhesive should not be super gooey or thick,” says Liv.
The Tutorial:
1. “Apply one coat of black mascara prior to application to get extra bonding of the lashes.
2. Once you begin applying your lashes you will want to use an angled or straight tweezer to get more accurate placement. If your natural lashes grow straight down, use an eyelash curler to give a little lift.
3. Once the temporary lashes are on, you can apply a liquid eyeliner or dark shadow to cover the base of the lashes or any glue mistakes.
4. Remove lashes carefully by soaking a cotton pad in olive oil and press down over the lashes. Hold in place, letting the oil saturate for 5 minutes before gently sliding the lashes downward.
I avoid applying foundation at all costs. I don’t like the texture of foundation, its heaviness and the constant thought that I’m clogging my pores. The last time I wore foundation, it was the Kennedy Center Honors in December. It was a must since I was on the red carpet interviewing Sarah Jessica Parker, who looked absolutely flawless that evening.
Speaking of flawless, I tested Benefit’s Hello Flawless foundation ($34) recently and immediately my foundation fears subsided. The brightening liquid foundation offers great coverage but also allows a natural complexion since it’s made with Oxygen Wow Hydrating Complex and SPF 25.
Available in nine shades, this creamy lightweight foundation boosts cellular respiration and helps protect against environmental (and emotional) stresses.

 Tweet
Tweet